
Paper-Quilled Butterflies

As we reach the end of our top 5 list, we celebrate a simple but lovely little craft. Our #5 most popular post is Paper-Quilled Butterflies. We hope you enjoyed this look back! Please check in next week when we will return with new projects for you and your home.
I looked out of the window yesterday and swore somebody took April Fools to a new level, standing on my roof throwing buckets of fake snow into the sky. Really? Snow? Combine that with a fast approaching Motherboards deadline, and boom: inspiration for a super-easy craft that sets the spring mood, inside.
The fine art of paper-quilling can be brought back to toddler basics by keeping shapes simple and paper strips wide. but when you have some time and you want to do some super quilling, google it and you will find some amazingly intricate creations.
By: Liesbeth
Time to Create
45 minutes of crafting fun
Costs to Create
$1.70 is what I paid at a dollar store for some coloured paper.
What do you need?
- Coloured paper
- Black paper or black crafting foam
- Scissors
- Glue
Instructions

- Cut paper in strips of 3/4 inch. For older children, you can scale things down and make them more intricate and strips can be smaller to 1/4 inch. To get started on quilling and have some simple fun, keep it at 3/4 inch.
- Roll strip of paper tightly around a pencil and hold for a bit. Then release and the little roll will, by itself, unroll slightly.
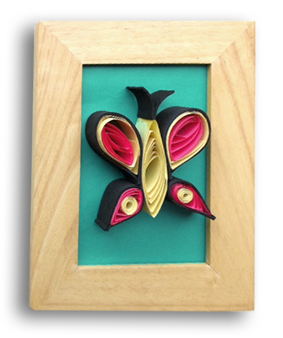
- Take your paper roll and pinch on one side. Press firmly and now your roll will stay put in a teardrop shape. This will be the start of one of your butterfly wings. Repeat 4 times to get all the pieces that are fushia pink in the above tutorial pictures. To make the bigger wings, I have added the yellow. You follow the same steps but unroll your paper roll a bit more so it fits around the pink part you already made. For the smaller butterfly wings I created tiny little yellow rolls to put in the middle. Again, repeat same instructions but this time do not unroll your paper roll but place inside the pink part you already made.
- For the body of the butterfly I did the same, but glued 2 paper strips together to make this larger body. Again, I rolled it around the pencil and unrolled it a lot, then pinched both sides of the roll to shape the narrow body with points at each end.
- You could leave your butterfly just like this (see first image on bottom row above) or you can create the black “outline” with black paper strips or like I did, with black craft foam. Fold paper or foam around each shape and cut to size. Glue and pinch with your fingers until glue has set (tip: use some clothes pins to do the pinching work for you). For the butterfly antennas simply cut a small strip of black paper or foam and fold.
Your butterfly is done. Use glue to fix it on craft paper, or to the front of a thank you note to make a cute card. Or use a small picture frame (remove glass) and glue your butterfly on some fun, coloured paper as I quickly did to demonstrate, below.


I enjoy what you guys are up too. Such clever work and coverage!
Keep up the fantastic works guys I’ve included you
guys to my own blogroll.