
Pom Pom Creations | DIY Kids Activities

This year, my son Cole has become very interested in making pom poms. This past summer, we got my daughter Calla interested as well and we spent an entire afternoon at the cottage making some giant ones, but smaller pom poms are achievable in much less time. This is also a great activity for a rainy fall day.
By: Janet
Materials and Tools Required:
– Cardboard (corrugated or a cereal box will do)
– Scissors
– Wool
– Compass, or Salad Plate and small serving bowl (something approx 1.5 smaller in diameter than your plate)
– Pencil
Project Costs: You should have most of these items on hand, wool can be purchased fairly cheaply at craft and wool stores if you go the acrylic route.
Tutorial:
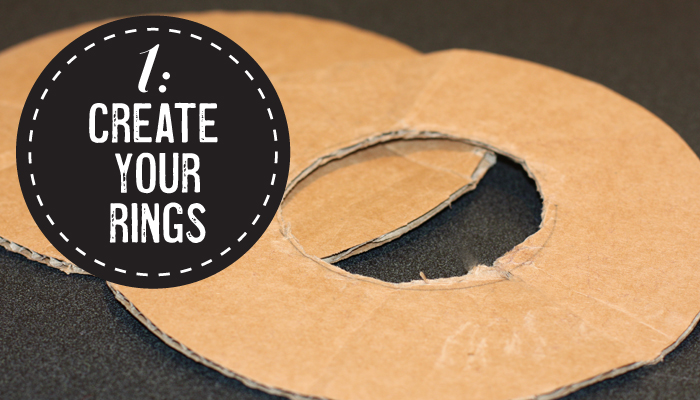
STEP 1: CREATE YOUR RINGS
Draw an exterior circle on your cardboard using your compass or salad plate. Tip: The exterior ring determines the size your pom pom will eventually be. Next draw an interior ring centered within the exterior ring. Tip: The interior ring will determine the length of strands your pom pom will have. It needs to be large enough to pass a small ball of wool through when wrapping your rings.
STEP 2: CHOOSING YOUR WOOL
Here is your chance to use up any left over wool from other projects, or you can purchase it cheaply at a craft or wool store such as Michaels. Don’t be afraid to mix it up, introducing new colours in the wrapping process.

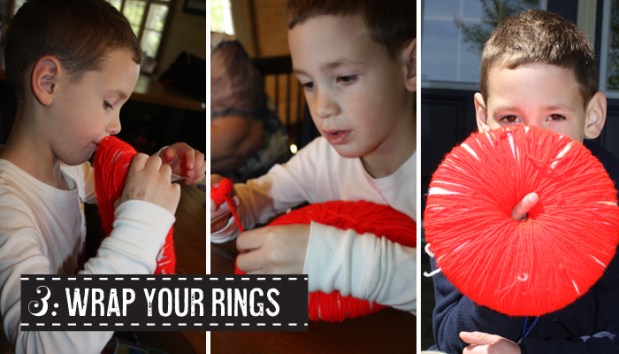
STEP 3: WRAPPING YOUR RINGS
You will need to create smaller balls of wool from your larger skein of wool. They need to be small enough to pass through the center of your rings. Place your two rings together, take the loose end of your small ball of wool and tie the rings together. This will give you a secure starting point. Start wrapping the rings. You will need to create several smaller balls of wool to complete the entire pom pom, keeping in mind they need to get smaller as the center of your rings gets smaller. Continue wrapping until the centre hole is quite small.
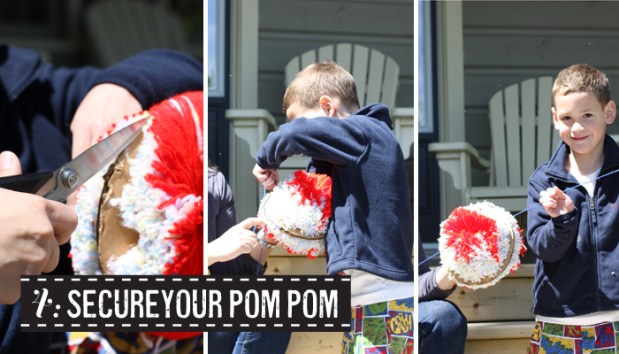
STEP 4: SECURING YOUR POM POM
Take your scissors, place them between your two rings and start to cut the wool all the way around. If you have wrapped the rings enough, the cut wool will stay in place until you tie it off. Next, cut yourself a longish piece of wool from your skein, then slide it between the two rings and tie it off, tightly securing the center of the pom pom.
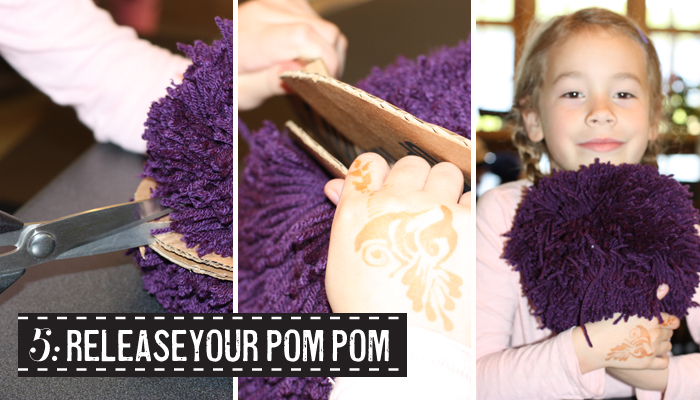
STEP 5: RELEASING YOUR POM POM
Carefully cut a slit in each ring (making sure not to cut the piece you just tied around the pom pom’s core. Slide both rings off of your pom pom and enjoy!


