
Littlest Pet Shop | Birthday Decorations

The invitations went out (see earlier post) and the results were in. Twelve little girls would be attending Calla’s Littlest Pet Shop party. It was time to roll up my sleeves and start getting our house party-ready! We needed loot bags, decorations, games and food! Lucky for me, I had two pea-sized helpers to give me a hand and make it that much more rewarding.
Submitted by: Janet

LOOTBAGS
Total Time Required: 1 hour
Materials and Tools Required:
$1.99 Brown paper bags at Loblaws
$9.95 Small pad of assorted scrapbooking paper, 4.75″ x 6.75″ at Michaels (to also be used for my hanging flags)
$1.00—$6.99 Assorted tissue at Dollarama & Amazing Party Store (polka dots)
$16.00 Pink Bakers Twine from online supply store Greenmunch (purchased previously for my birthday invites, see earlier post)
Glue stick
Craft knife (or scissors)
Metal ruler with cork backing (if using exacto knife)
Cutting Mat (if using craft knife)
Printer
Tutorial:
These beautiful loot bags are affordable and super easy to make.
1) Create and print guests’ names onto an 8.5″ x 11″ sheet of paper and cut out. I used a script font. There are tons to choose from free at Google Fonts. My tags were 1.5″ x .5″.
2) Use your assorted scrap book paper from your pad and cut .25″ larger all around than your nametags. I cut mine to 2″ x 1″.
3) Glue on to paper bag
4) Insert assorted colourful tissue
Tip 1: When making the name tags, put a fine, light grey keyline around your nametags where you want to cut before you print them out. This makes it easier to cut out later. The light grey line means it’s not easily seen if you miscut.
Tip 2: Put one or two small items in the bag, have bowls of prizes for your party games and let the kids pick their own loot bag prizes. If you finish your party with a pinata they can add the items they collected there as well.

FLOWER POM POMS
Total Time Required: 1 hour (for three)
Materials and Tools Required:
$1.00 / pack of 20 sheets, assorted coloured tissue at Dollarama (8 sheets per pom pom)
$1.00 Pipe cleaners (to hold center)
Scissors
String to hang them with (I used my Pink Bakers Twine I purchased from Greenmunch, you can also use fishing line if you want them to look like they are floating)
Tutorial:
Do not be intimidated by how amazing these look, they are really easy! This is a great craft to do with your kids (supervision required to keep creases crisp and even), or if you’re strapped for time teach the grandparents as well and have a pom pom-making party. There is a great tutorial on youtube which you can view here.
Tip 1: Martha Stewart asks for white cloth-covered floral wire to bind the centers, I swapped out the pipe cleaners instead which do the trick just fine. The flower hides them so they are not visible anyway.
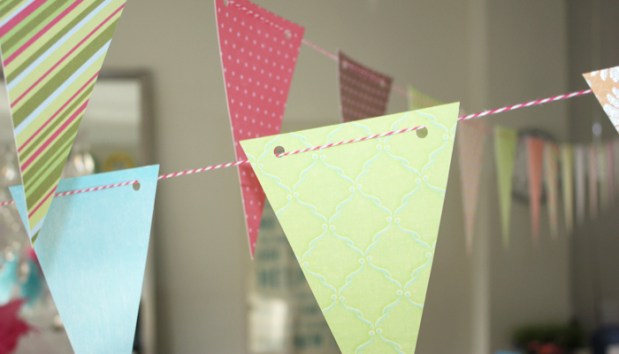
HANGING FLAGS
Total Time Required: 1.5 hour (for four)
Materials and Tools Required:
$9.95 Small pad of assorted scrapbooking paper, 4.75″ x 6.75″ at Michaels (purchased previously for the lootbags)
$16.00 Pink Bakers Twine from online supply store Greenmunch (purchased previously for my birthday invites see earlier post)
Craft knife
Metal ruler with cork backing (if using craft knife)
Cutting Mat
Hole Punch
Tutorial:
Again, very easy to make and add a lovely festive feel to the room. I made four and hung two in my living room and two in my dining room.
The scrap booking pad was the perfect size to make these flags. I have put together a quick tutorial which you can download here. JanetNewFlagInstructions
Tip 1: To make the trimming go faster try trimming 5 pages at once. The trick to using a craft knife is to gently repeat the same cut over and over until you feel the cutting mat. Don’t try to do one hard cut through multiple pieces of paper the chance of miscutting is greater then.
Tip 2: These are a versatile decoration, this is the second time I have made a set of flags (see earlier Super Mario Birthday post to see how a boy’s version can look).
Tip 3: These are reusable! Don’t throw out all of your hard work. I have carefully packed these in zip lock bags and added them to my party storage bin for the next festive occasion!
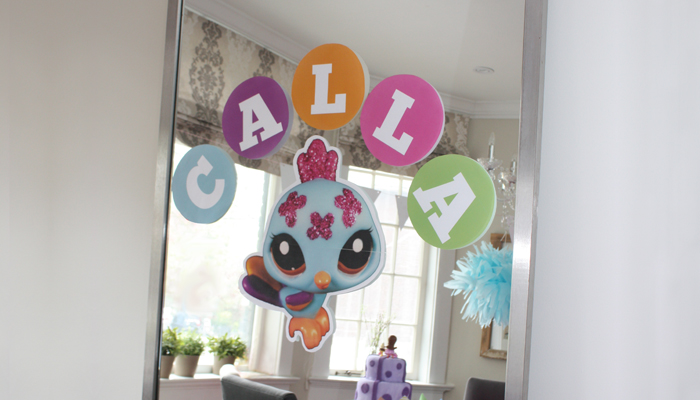
WALL OR MIRROR DECORATIONS
Total Time Required: 30 mins
Materials and Tools Required:
Scissors
Printer
Tape
Tutorial:
I find this an easy way to extend the theme of the party and put the birthday child’s name front and center. Simply create a document on your computer (8.5″ x 11″), draw 1 large circle per page and insert 1 letter. Print and cut out each letter and tape to mirror or blank wall. Download a character of choice, when using google search look for ones that are higher resolution. I printed this on two 11″ x 17″ pieces and taped together on the seam.
Check back to see how I tackled the food and cake (first time trying fondant – literally finished 5 minutes before guests arrived!)


Seriously Janet – this is amazing!
First of all I want to say terrific blog! I had a quick
question which I’d like to ask if you do not mind. I was interested to
find out how you center yourself and clear your thoughts prior to writing.
I’ve had a tough time clearing my thoughts in getting my thoughts out there.
I truly do enjoy writing but it just seems like
the first 10 to 15 minutes are wasted just trying to figure out how to begin. Any recommendations
or hints? Many thanks!
Just write whatever you can at the moment! You can always go back and edit or add an introduction later. Simply let your thoughts spill onto the page and clean it up after.