4 Basic Tricks of the Trade | Sewing Pillows

I was so tired of this winter and even more tired of my unfinished living room. We’ve been in our house 3 years now and our living room is the first thing you see when you enter. It just needed a little push to bring it from boring to I’m-not-embarrassed-to-open-my-front-door-anymore! I started with pillows for the couch. I thought I would share in this post a few of the sewing tips I have learned over the years.
By: Janet
My living room chairs are a bit tricky. When I first bought our bird-patterned, wingback chairs I thought they were lovely, but when I started trying to figure out what other textures, patterns and fabrics that would match the birds, it got a bit complicated. I started with my favourite fabric store: Designer Fabrics. Why is that my favourite store? First, they have a fantastic website that has ALL of their swatches. So before I even go to the store I cruise their website looking for fabrics I think might work. I then drag images of them to my desktop and print them out. Each image has a skew attached so if you can’t find it yourself in the store simply show a sales clerk (there are plenty of them and they all know their stuff) to track it down for you. But wait there’s more! The second reason I love this store so much is you can take home (up to 8 at a time) samples to see what is going to work for your project at home (with your natural light and own furniture). Much easier than dragging my wingback chairs to the store!
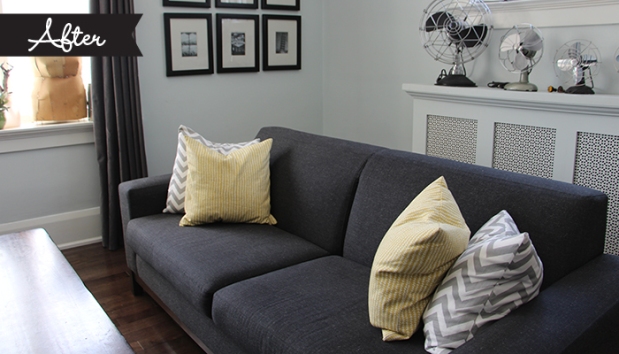
Below is me testing out my final choices (with chosen buttons) to see if they all work together. I chose a micro chevron for the wingback chairs (because the pattern is small it does not overpower the bird pattern) and complimented it with a larger chevron pattern for my plain grey couch. I then chose the yellow fabric for my second couch cushion which has a bit of a natural viney feel to add a pop of colour and play up on the nature aspect of my bird chairs. Yin/yang design!
Tip 1: Choosing your fabric
When making pillows in a high traffic area, where your pillows will actually get used, stick to thicker, more durable fabrics such as cotton, polyester blends and woven. If you have children, keep in mind washability.
Tip 2: Sewing in a zipper without basting or a zipper foot!
Well maybe this isn’t a tip to make you sew like a professional but it’s one that skips a couple of steps and therefore saves time. I learned this from my mother because we had such an old machine the extra parts (like zipper feet) had walked off long ago (ahem pardon the pun!). Any hoo, fold and finger press seam back where you want to stitch the zipper, then open zipper and pin to seam to one side of open zipper. Sew along the edge with the foot touching the bump of where the zipper comes up as close as possible. When you are 2-3 inches from the end of the zipper, carefully raise the foot of your machine while leaving the needle in the down position (penetrating the fabric). Then zip up the zipper past the foot and continue sewing. See images below. Repeat this process for the other side of the zipper. I like my zippers to be hidden so I make sure I have enough overlap to hide zipper, (see two photo’s down).

Tip 3: Creating pointy corners
So your pillow is all sewn up. Now it’s time to turn it inside out. Before you do that you need to trim the corners (see photo below). Cut as close as you can without cutting the stitching. I know you are probably worried that the edge will start fraying and mess up your beautiful corners. But don’t, the tension of turning the fabric inside out keeps it all together.
Tip 4: Working with patterns
This comes in to play with any sewing project whether it be pillows or a dress. You always want to align the pattern so it flows from one piece to the next, see my sewn in zippers below and how the pattern smoothly runs from the to to the bottom. You can always tell when a piece is poorly made when the two sides don’t align.
Below are my before and afters as well as close ups to my finished pillows 


 .
.


You did great! I always find the trick to be to choose a pattern bigger or smaller than the original and keep the tone or pallet similar or really contrasting, like you did. I cant sew to save my life so I admire your skill!