DIY Wool dryer balls

Laundry is a never ending chore. As a result, we use a never ending amount of laundry soap and fabric softener. These super-simple to make dryer balls are a pretty, eco-friendly and customizable alternative to fabric softener. Get your kids involved in this one – it’s so easy!
By: Julia
Materials
• 1 or more balls of 100% wool yarn (NOT superwash). I used Patons Classic Wool worsted and Patons Classic Wool roving available at yarnspirations.com and at many craft and yarn stores including Michaels. Tip: The courser and itchier the yarn, the better it will work for this project!
• Pantyhose
• Optional: Essential oil in your favourite scent. I use NOW lemongrass purchased at a health food store.
Project Cost: $10 – $30
To get good results with your dryer balls, your yarn needs to be 100% wool. The magic of this project lies in wools ability to turn to felt (technically this is called “fulling”). Ever put a wool sweater in the wash by accident and have it come out half the size and stiff as a board? Yep, that’s the magic of felting. To get a wool yarn to felt like this on purpose you need three basic things: heat, water and agitation. So to create our dryer balls we’re going to first toss them, like all laundry, in the washing machine.
To begin, you’ll need to wind your yarn into balls. Most yarn is sold in pre-wound skeins that look like this:

This format is great for most projects, but we want nice round spheres. Because I’m an avid knitter, I have a stash of yarn and lot of leftover from previous projects. This is great project to use up those ends! Whether you’re starting from a nice fresh ball or have a heap of scraps like me, it’s time to start winding!

It’s probably a no brainer, but if you’ve never wound a ball of yarn or string before, begin by wrapping the yarn around your fingers several times, then remove from your fingers and continue wrapping in a different directions. Repeat, changing directions to keep your shape smooth until you have a ball of desired size. Cut the yarn and tuck the ends in to secure.
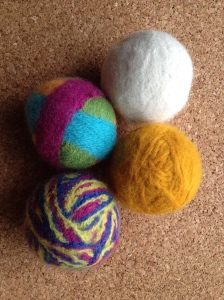
Because we are going to felt the yarn and that will cause it to condense and shrink, wind balls slightly larger than you wish your final dryer ball size to be. I wound balls to be approximately softball sized and ended up with dryer balls that were tennis ball sized.
Have fun mixing up your colours! Above I wound 3 strands in different colours all together, and below I tried winding one colour at a time, making sure to leave each layer of colour showing through.
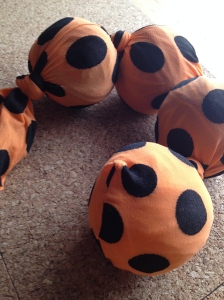
Next, it’s time dress up those yarn balls in pantyhose. To prevent the balls from sticking together and wool fluff getting all over your machine, it’s best to protect them this way. This is a great way to recycle those stockings with runs in them, or find a use for strange halloween tights like mine below! Cut off one leg of the pantyhose and push a yarn ball all the way to the toe. Tie in a knot close to the ball. Repeat if you are making several dryer balls.
Now toss the funny looking caterpillar you’ve made into the washing machine with your next load of laundry. A few tips:

– Washing the balls with other laundry will help with the felting process by creating extra agitation.
– Top loading machines work best for felting. If you have a top loader you may only need to run the dryer balls through one wash in order to felt solidly. I have a front loader H.E. machine and I put my dryer balls through three cycles to get good results. Just check between cycles to see if the balls have felted to your liking.
When your happy with the felting of your dryer balls… toss em in the dryer! It may take quite some time for the balls to dry thoroughly so it’s best to run them through several dry cycles. The nice part is, they can begin to do their job whether they are still damp or not.
Optional: I hate synthetic scents and many dryer sheets and fabric softeners are overly perfumed. Here’s your chance to customize the scent of your laundry. Place a few drops of essential oil onto your dryer balls and they will distribute the scent throughout your washing. I like lemongrass as it’s very fresh smelling and not too “girly” if you’ve got a co-ed household. You’ll need to reapply the oil every 2 or 3 loads.
That’s it! A recipe for soft and sweet-smelling laundry.


